What's new:
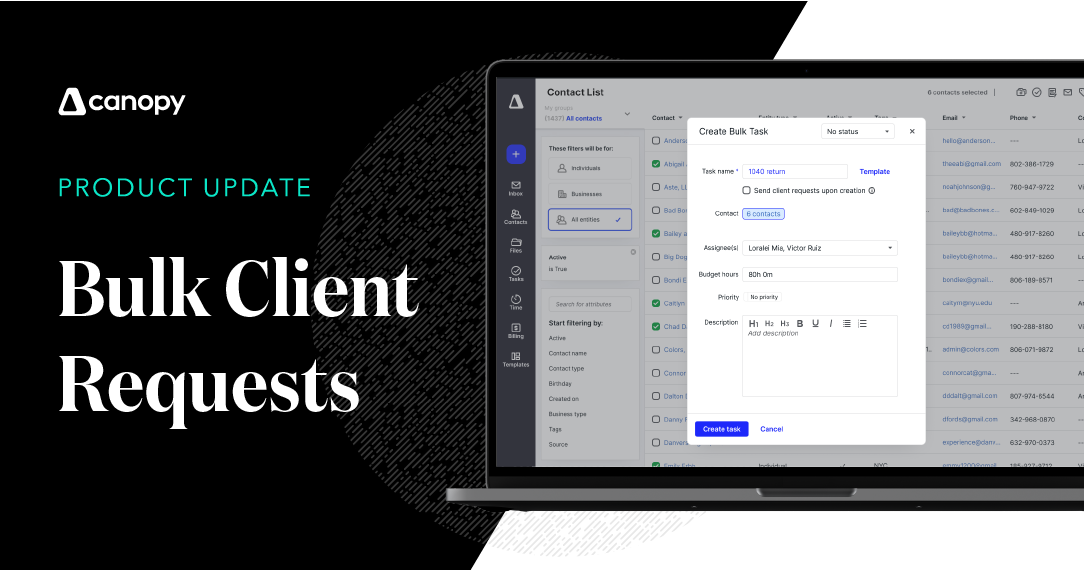
Communicating with your clients by sending client requests is likely a large part of your firm’s daily work. You’ll be pleased to hear that we’ve improved this experience within Canopy by making it possible for you to create and send multiple client requests in one bulk action. Previously, Canopy users could only create and send client requests one at a time. Now, you can select two or more clients then create and send all of those client requests at once directly from the contact list within the Client Management module.
How it works:
Creating and sending a new client request
When a user clicks on the contact list (on the global navigation, on the left side of the screen) and selects two or more contacts, a new bulk action icon will appear in the upper right hand corner of the screen (it looks like a person with a paper airplane on it). Upon clicking this button, a modal will appear in the middle of the screen displaying fields regarding the client request. These include:
-
-
- Adding a request name (or using a template)
- Confirming contacts (the ones you selected in the previous screen)
- Appointing the priority level
- Adding a description in the text field (this is where you’d enter the bulk of the message that will appear in the email sent to them and
- Selecting internal assignee(s)
- Determining the client due date
- Adding a client reminder
-
Once these fields are filled in (not all of the fields are required) then you will be able to create the client request or cancel. If you create the client request, the request will be sent to the selected individuals, the modal will disappear, and a pop-up message will display at the bottom of the screen indicating that your multiple client requests are being created with the option to view them in your activity log.
It is important to know that in order to receive a client request, clients first have to be invited to the Canopy Client Portal (this is the main hub where they’ll receive messages and follow a to-do list). If you select two or more clients to send a client request to that have not been invited to the Client Portal, a modal will list those clients. If you proceed to send the client request, the client requests associated with individuals who have not been invited to the Client Portal will be created as drafts until you invite them to the Client Portal.
There are several ways and places to invite your clients to the Client Portal. These include through the following paths:
-
-
- Contact tab: Click on the contacts tab in the main navigation on the left of your screen. Navigate to the "manage Client Portals" button in the top left corner of your screen and filter for "without Client Portal." Select the individual or individuals you want to send an invite to the Client Portal to and click "send now."
- Contact list: If you have a draft client request created, click on the contact list and select one of your clients. Under the task tab, you can see a list of draft client requests. If you select the draft client request, you can click “send now” and it will prompt you to invite them to the Client Portal if they haven’t already been invited.
- Tasks tab: (This requires a license to the Workflow module.) If you click on the task tab, select task list and filter the status column to view drafts. Select a draft and a modal will appear. Click “send now” and it will prompt you to send an invitation to the Client Portal.
-
Creating and sending multiple client requests in a template
Precursor : In order to send multiple client requests in a template, you must first set up the templates beforehand. There are two types of client requests within templates—a client request template and a client request as a subtask on a task template (see the Get Started section below for instructions on how to set these up). In this article, we’ll only be addressing the first one.
Client request template
After selecting the multiple clients in your contact list, select the bulk client request icon in the top right of your screen (looks like a person with a paper airplane). Instead of typing in a request name you’ll click on “template” and choose from the list of client request templates. Fill in the remaining fields in the modal and click “send now” to send multiple client requests through a client request template.
Why it matters:
We care about the time that you are spending—or that you don’t have to spend—on performing actions within Canopy. By adding the functionality to create and send multiple client requests at once, it will help you and your team save time reaching out to your clients to request information or asking them to perform a task.
One example of this might involve you wanting to send an extension reminder to a group of clients. Others might include requesting they upload a file to the Client Portal, that they verify information, remind them about an upcoming deadline, or many more requests that you might need to communicate to your clients to quickly and efficiently perform your work.
We’ve worked hard to make this process simple for you to initiate and perform. However, we’re always open to your feedback if there are ways we can make it even better. Share your feedback today or vote on other user’s ideas.
Where to find it:
The majority of creating and sending multiple client requests at once is a feature found within our Client Management module. However, to utilize its full functionality, there are also places to interact with this feature in our Workflow module too.
Get started:
Invite Clients to the Client Portal
Add Client Request templates to Task Templates
Using Client Request Templates (Creating, Editing, Deleting)


Get Our Latest Updates and News by Subscribing.
Join our email list for offers, and industry leading articles and content.